Writing a New Post
This tutorial covers how to write a post in the Chirpy template. It’s worth reading even if you know Jekyll, since many features rely on specific variables.
Writing with dumalog


Prefer to skip the boilerplate? dumalog is an AI writing agent that turns your development conversations (Claude Code, Codex CLI) into publish-ready Jekyll posts. It stores your chat history locally in a memPalace index and drafts posts with the correct front matter — including NLO’s language / translation_key fields — so drafts land ready to publish.
1
2
3
curl -fsSL https://raw.githubusercontent.com/GoXLd/dumalog/main/install.sh | bash
dumalog setup            # find your blog, learn its style
dumalog write "topic"    # draft a post (omit topic for suggestions)
Everything runs locally; only the anonymized context needed to draft a post is sent to the model you configure. The rest of this guide covers the front matter and Markdown that dumalog fills in for you — handy when you want to tweak a draft by hand.
Naming and Path
Create a file named YYYY-MM-DD-TITLE.EXTENSION in _posts at the root. The EXTENSION must be md or markdown. To save time, the Jekyll-Compose plugin can create files for you.
Front Matter
Fill the Front Matter at the top of the post:
1
2
3
4
5
6
---
title: TITLE
date: YYYY-MM-DD HH:MM:SS +/-TTTT
categories: [TOP_CATEGORY, SUB_CATEGORY]
tags: [TAG]     # TAG names should always be lowercase
---
The posts’ layout has been set to
postby default, so there is no need to add the variable layout in the Front Matter block.
Timezone of Date
To record a post’s release date accurately, set the timezone in _config.yml and also give the post’s timezone in its date field. Format: +/-TTTT, e.g. +0800.
Categories and Tags
Each post takes up to two categories and any number of tags. For instance:
1
2
3
4
---
categories: [Animal, Insect]
tags: [bee]
---
Author Information
Author info usually needn’t go in the Front Matter; by default it comes from social.name and the first entry of social.links in the config. To override it, add the author to _data/authors.yml (create the file if it doesn’t exist):
1
2
3
4
<author_id>:
  name: <full name>
  twitter: <twitter_of_author>
  url: <homepage_of_author>
And then use author to specify a single entry or authors to specify multiple entries:
1
2
3
4
5
---
author: <author_id>                     # for single entry
# or
authors: [<author1_id>, <author2_id>]   # for multiple entries
---
The author key can also hold multiple entries.
The benefit of reading the author information from the file
_data/authors.ymlis that the page will have the meta tagtwitter:creator, which enriches the Twitter Cards and is good for SEO.
Post Description
By default the post’s opening words appear on the home page list, in Further Reading, and in the RSS feed. To replace that auto-generated snippet, set the description field in the Front Matter:
1
2
3
---
description: Short summary of the post.
---
The description text also appears under the title on the post page.
Table of Contents
By default the Table of Contents (TOC) shows in the right panel. To disable it globally, set toc to false in _config.yml. To disable it for one post, add to its Front Matter:
1
2
3
---
toc: false
---
Comments
Comments are set globally via comments.provider in _config.yml. Once a provider is chosen, comments are enabled on all posts.
To disable comments for one post, add to its Front Matter:
1
2
3
---
comments: false
---
Media
In Chirpy, images, audio, and video are all media resources.
URL Prefix
To avoid repeating the same URL prefix across a post’s resources, set one of two parameters.
If a CDN hosts your media, set
cdnin_config.yml. URLs for the site avatar and posts are then prefixed with the CDN domain.1
cdn: https://cdn.com
To set a path prefix for the current post/page, use
media_subpathin its front matter:1 2 3
--- media_subpath: /path/to/media/ ---
site.cdn and page.media_subpath combine to form the final URL: [site.cdn/][page.media_subpath/]file.ext
Images
Caption
Italicize the line right after an image to turn it into a caption below the image:
1
2

_Image Caption_
Size
Set each image’s width and height to stop the layout from shifting as it loads.
1
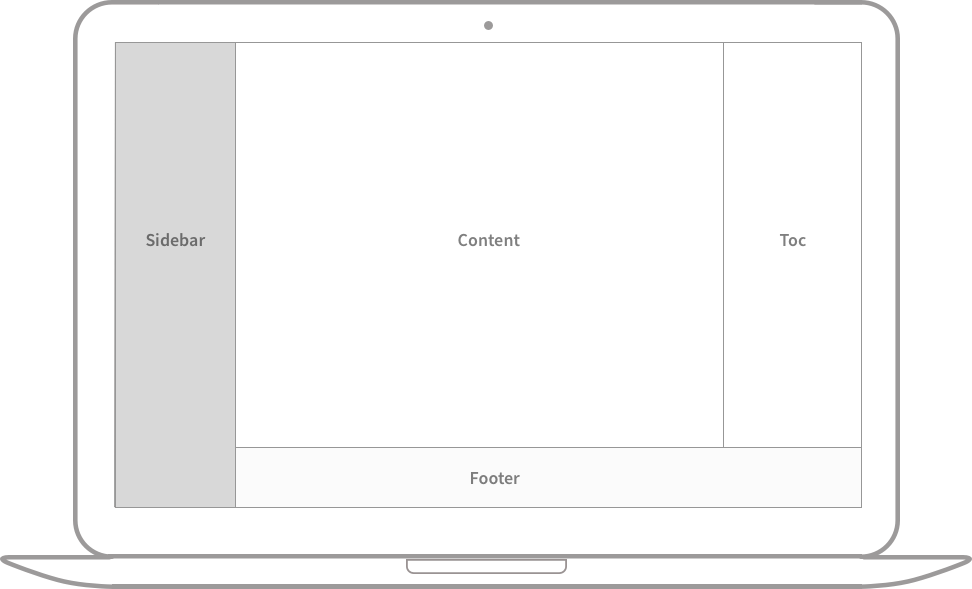{: width="700" height="400" }
For an SVG, you have to at least specify its width, otherwise it won’t be rendered.
Since Chirpy v5.0.0, height and width can be abbreviated (h, w). This is equivalent to the above:
1
{: w="700" h="400" }
Position
Images are centered by default; use the normal, left, or right class to position them.
Once the position is specified, the image caption should not be added.
Normal position
Image will be left aligned in below sample:
1
{: .normal }
Float to the left
1
{: .left }
Float to the right
1
{: .right }
Dark/Light mode
Images can follow the dark/light theme. Prepare two images and assign each the dark or light class:
1
2
{: .light }
{: .dark }
Shadow
Screenshots of program windows can carry a shadow effect:
1
{: .shadow }
Preview Image
For an image at the top of the post, provide one at 1200 x 630. If the aspect ratio isn’t 1.91 : 1, it will be scaled and cropped.
Then set the image attributes:
1
2
3
4
5
---
image:
  path: /path/to/image
  alt: image alternative text
---
media_subpath applies to the preview image too, so once it’s set path needs only the file name.
For simple cases, use image alone to set the path:
1
2
3
---
image: /path/to/image
---
LQIP
For preview images:
1
2
3
4
---
image:
  lqip: /path/to/lqip-file # or base64 URI
---
You can observe LQIP in the preview image of post "Text and Typography".
For normal images:
1
{: lqip="/path/to/lqip-file" }
Social Media Platforms
Embed video/audio from social platforms with:
1
{% include embed/{Platform}.html id='{ID}' %}
Platform is the lowercase platform name and ID is the video ID.
This table shows how to read both parameters from a URL, and which platforms are supported.
| Video URL | Platform | ID |
|---|---|---|
| https://www.youtube.com/watch?v=H-B46URT4mg | youtube | H-B46URT4mg |
| https://www.twitch.tv/videos/1634779211 | twitch | 1634779211 |
| https://www.bilibili.com/video/BV1Q44y1B7Wf | bilibili | BV1Q44y1B7Wf |
| https://www.open.spotify.com/track/3OuMIIFP5TxM8tLXMWYPGV | spotify | 3OuMIIFP5TxM8tLXMWYPGV |
Spotify supports some additional parameters:
compact- to display compact player instead (ex.{% include embed/spotify.html id='3OuMIIFP5TxM8tLXMWYPGV' compact=1 %});dark- to force dark theme (ex.{% include embed/spotify.html id='3OuMIIFP5TxM8tLXMWYPGV' dark=1 %}).
Video Files
To embed a video file directly:
1
{% include embed/video.html src='{URL}' %}
URL points to a video file, e.g. /path/to/sample/video.mp4.
The embedded video also accepts these attributes:
poster='/path/to/poster.png'— poster image for a video that is shown while video is downloadingtitle='Text'— title for a video that appears below the video and looks same as for imagesautoplay=true— video automatically begins to play back as soon as it canloop=true— automatically seek back to the start upon reaching the end of the videomuted=true— audio will be initially silencedtypes— specify the extensions of additional video formats separated by|. Ensure these files exist in the same directory as your primary video file.
An example using all of them:
1
2
3
4
5
6
7
8
9
10
{%
  include embed/video.html
  src='/path/to/video.mp4'
  types='ogg|mov'
  poster='poster.png'
  title='Demo video'
  autoplay=true
  loop=true
  muted=true
%}
Audio Files
To embed an audio file directly:
1
{% include embed/audio.html src='{URL}' %}
URL points to an audio file, e.g. /path/to/audio.mp3.
The embedded audio also accepts these attributes:
title='Text'— title for an audio that appears below the audio and looks same as for imagestypes— specify the extensions of additional audio formats separated by|. Ensure these files exist in the same directory as your primary audio file.
An example using all of them:
1
2
3
4
5
6
{%
  include embed/audio.html
  src='/path/to/audio.mp3'
  types='ogg|wav|aac'
  title='Demo audio'
%}
Pinned Posts
Pin one or more posts to the top of the home page (pinned posts sort by release date, newest first). Enable with:
1
2
3
---
pin: true
---
Prompts
Prompts come in four types: tip, info, warning, and danger. Add the prompt-{type} class to a blockquote. For example, an info prompt:
1
2
> Example line for prompt.
{: .prompt-info }
Syntax
Inline Code
1
`inline code part`
Filepath Highlight
1
`/path/to/a/file.extend`{: .filepath}
Code Block
Create a code block with ```:
1
2
3
```
This is a plaintext code snippet.
```
Specifying Language
Use ```{language} for syntax highlighting:
1
2
3
```yaml
key: value
```
The Jekyll tag
{% highlight %}is not compatible with this theme.
Line Number
All languages except plaintext, console, and terminal show line numbers by default. To hide them, add the nolineno class:
1
2
3
4
```shell
echo 'No more line numbers!'
```
{: .nolineno }
Specifying the Filename
The code language shows at the top of the block. To replace it with a file name, add the file attribute:
1
2
3
4
```shell
# content
```
{: file="path/to/file" }
Liquid Codes
To display a Liquid snippet, wrap it in {% raw %} and {% endraw %}:
1
2
3
4
5
6
7
{% raw %}
```liquid
{% if product.title contains 'Pack' %}
  This product's title contains the word Pack.
{% endif %}
```
{% endraw %}
Or adding render_with_liquid: false (Requires Jekyll 4.0 or higher) to the post’s YAML block.
Mathematics
Math is rendered with MathJax. For performance it isn’t loaded by default; enable it with:
1
2
3
---
math: true
---
Once enabled, add equations with this syntax:
- Block math should be added with
$$ math $$with mandatory blank lines before and after$$- Inserting equation numbering should be added with
$$\begin{equation} math \end{equation}$$ - Referencing equation numbering should be done with
\label{eq:label_name}in the equation block and\eqref{eq:label_name}inline with text (see example below)
- Inserting equation numbering should be added with
- Inline math (in lines) should be added with
$$ math $$without any blank line before or after$$ - Inline math (in lists) should be added with
\$$ math $$
1
2
3
4
5
6
7
8
9
10
11
12
13
14
15
16
17
18
19
20
21
22
23
24
25
26
<!-- Block math, keep all blank lines -->

$$
LaTeX_math_expression
$$

<!-- Equation numbering, keep all blank lines  -->

$$
\begin{equation}
  LaTeX_math_expression
  \label{eq:label_name}
\end{equation}
$$

Can be referenced as \eqref{eq:label_name}.

<!-- Inline math in lines, NO blank lines -->

"Lorem ipsum dolor sit amet, $$ LaTeX_math_expression $$ consectetur adipiscing elit."

<!-- Inline math in lists, escape the first `$` -->

1. \$$ LaTeX_math_expression $$
2. \$$ LaTeX_math_expression $$
3. \$$ LaTeX_math_expression $$
Starting with
v7.0.0, configuration options for MathJax have been moved to fileassets/js/data/mathjax.js, and you can change the options as needed, such as adding extensions.
If you are building the site viachirpy-starter, copy that file from the gem installation directory (check with commandbundle info --path jekyll-theme-chirpy) to the same directory in your repository.
Mermaid
Mermaid is a diagram generation tool. Enable it per post via the YAML block:
1
2
3
---
mermaid: true
---
Then wrap the graph code in ```mermaid and ```, like any other language.
Learn More
For more on Jekyll posts, see the Jekyll Docs: Posts.